Scenes, Nodes and Scripts in Godot 4 – Tutorial
One of the key features of Godot is its scene system, which allows developers to create complex game worlds by assembling individual objects, or nodes, into a hierarchy. In this tutorial, I am going to introduce you to the basics of working with scenes, nodes and scripts in Godot 4.
Dear reader, please consider supporting my game ❤
Scenes
Scenes are collections of nodes that make up a particular level, menu, character, enemy or any other discrete part of your game. A scene can be saved as a separate file and loaded into your game as needed.
In Godot 4, scenes can be created by clicking Scene > New Scene via the menu item on the top left side. Once you’ve created a new scene, you can add nodes to it by adding them via the Plus sign at the top of the Scene Panel or dragging them into the Scene Panel from the File System panel.
Nodes
Nodes are the basic building blocks of Godot 4 scenes. Each node represents a single object in your game world, such as a sprite, a sound effect, a UI element, etc. Nodes can be organized into a hierarchy, with parent nodes controlling the behavior of their child nodes.
Godot 4 organizes nodes into categories based on their functionality, providing a streamlined structure for development. This, for example, are some of the most frequently used node categories:
- Control: Nodes that represent user interface elements, such as buttons and text labels.
- Node2D: Nodes that represent 2D objects, such as sprites and tiles.
- Node3D: Nodes that represent 3D objects, such as meshes and lights.
- Etc.
Each node has a set of properties that determine its behavior and appearance. For example, a sprite node has properties such as its texture, position, and scale (among others). For more information on all the different nodes, check out the official documentation.
Scripts
Scripts are an essential part of any game development project. They allow you to create custom behaviors and interactions that make your game unique. In Godot 4, scripts are written in the GDScript language, which is a dynamically typed scripting language with syntax similar to Python.
Each node can be extended by a script, allowing code to control the behavior of the node itself, as well as its children and/or parent.
Building a simple project
Let’s create a simple project in Godot 4 to showcase the basics of scenes, nodes, and scripts:
First open Godot 4 and select “New Project” from the project manager. Name your project and select a location to save it.
Creating the first scene
- In the Godot 4 editor, select Scene > New Scene from the top menu bar.
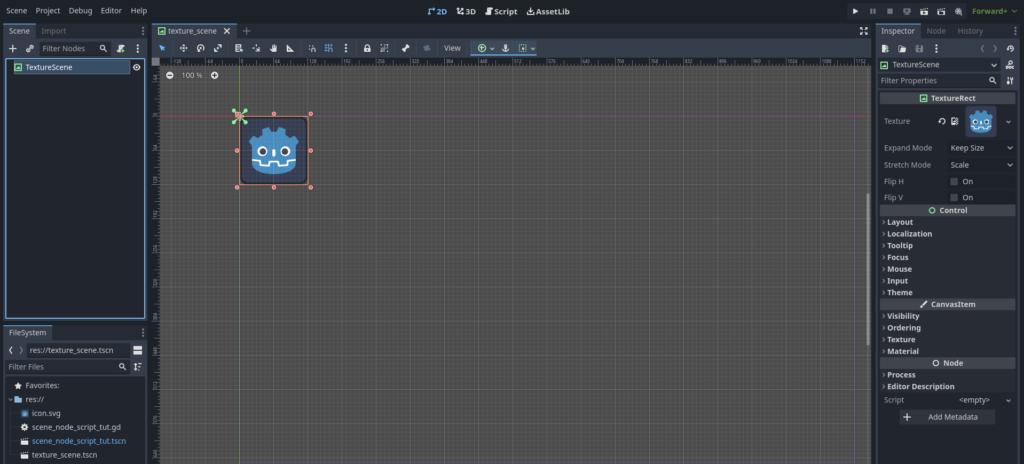
- In the scene panel, select Other Node and choose a TextureRect node from the list.
- Rename this to “TextureScene”.
- In the Inspector panel, select a texture by clicking Texture > Load and selecting an image file from your project directory. You can also just drag and drop an image into the texture property.
- Let’s just use the default “icon.svg” for the sake of this tutorial.
- Save the scene as “texture_scene.tscn”.
Making the main scene
- Then, go to Scene > New Scene and select Control (User Interface) from the list of nodes.
- Call this node “SceneNodeScriptTut”, or however you like.
- Next, click the Plus sign and add a Button node to the root node.
- Change the text property of the button to “Add Scene”.
- Drag your button to the desired location.

Adding a script
- Now we add a script to the SceneNodeScriptTut node.
- First, select the root node (SceneNodeScriptTut).
- Then click the “Attach new script” button above it.
- Click “no template” and save the new script as “scene_node_script_tut.gd”.
- A script symbol appears next to it.
- Click on the new script symbol to get into the code editor.
- Change the code to the following:
extends Control

# reference to the scene we want to add:
var texture_scene : PackedScene = preload("res://texture_scene.tscn")

@onready var button : Button = $Button

func _ready() -> void:
	button.pressed.connect(_on_button_pressed) # Connect the button pressed signal

func _on_button_pressed() -> void:
	var new_instance : TextureRect = texture_scene.instantiate() # make a new instance of the scene

	# give the instance a new, random position:
	new_instance.position = Vector2(randi_range(0, 1024), randi_range(192, 515))

	add_child(new_instance) # add the instance as a new child node
Wrapping up the tutorial for scenes, nodes and scripts in Godot 4
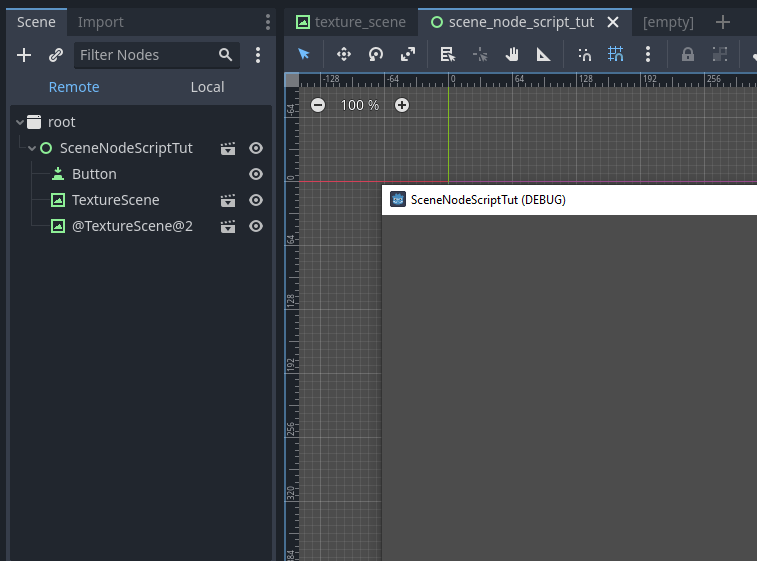
And that’s it. Save the scene and run the SceneNodeScriptTut scene. Whenever you click the button, it adds a new instance of the TextureScene to a random location. It should behave something like in the video below:
By observing the Remote Tab, you can actively observe the real-time addition of scenes to the node tree.
So, in this tutorial, I introduced you to the basics of working with scenes, nodes and scripts in Godot 4. I briefly explained what nodes, scenes and scripts are and how to build a simple project and utilize them. And with these fundamentals under your belt, you’re well on your way to creating more complex and interesting game worlds using Godot 4.
Download the source files
If already subscribed, you can find all project files here. Otherwise, you can subscribe to the mailing list to get access to this and other project files for free and get notified, when a new tutorial is posted.


