Simple Finite State Machine in Godot 4 – Tutorial
Welcome to this tutorial on implementing a simple Finite State Machine (FSM) in Godot 4! Finite State Machines are powerful tools for managing complex game behavior, allowing you to organize and control different states of your game entities efficiently. In this tutorial, I’ll guide you through the process of creating a simple FSM for a character in Godot 4. By the end, you’ll have a solid understanding of how to structure your game logic using states and transitions. There are different ways and more or less complex implementations of an FSM. This one is a very simple but, in my opinion, useful one. Now, let’s dive into the tutorial and empower your game development skills!
Dear reader, please consider supporting my game ❤
Set Up the Finite State Machine Project in Godot 4
- For the tutorial, I use a pack from kenney.nl. Great assets, but you are free to use whatever you like.
- Create a new Godot 4 project.
- Copy the asset files into the project folder.
Create the Game Objects
In order to demonstrate the FSM, we create a little level with a player, that is able to stay idle, walk and jump. Also, we want a fall state, for when the player falls down and after the jump.
Player
- Let us start with the Player.
- Go to Scene > New Scene, click “Other Node” and pick a CharacterBody2D.
- Name it “Player”.
- Add a CollisionShape2D to it.
- Next, add a Sprite2D and an AnimationPlayer.
- Select the CollisionShape2D and in the Inspector on the right add a new RectangleShape2D to the Shape property.
- Select the Sprite2D and drag and drop the character image into the Texture field.
- In Animation, set the H- and Vframes accordingly – in our example, Hframes to 9 and Vframes to 3.
- Set the Filter in the Texture section to “Nearest”.

- You should also adapt the CollisionShape according to the sprite.
- Next, let us create some animations, to showcase the FSM.
Idle Animation
- Select the AnimationPlayer and in the Animation Tab at the bottom, click on “Animation” and select “new”.
- Name the animation “idle”.


- We just make very simple animations for the sake of this tutorial.
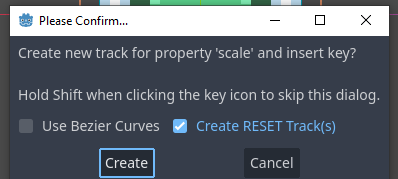
- So, with the animation track selected, click on Sprite2D, then go to the Animation section and click the Key Symbol on the Frame property at the value 0.
- Click on “Create” to create a new track.
- Shorten the track timeline to 0.1


Walk Animation
- For the walk animation, we create a new animation and call it “walk”.
- We select the sprite and click on the Key next to the Frame property.
- At timeline 0.0 the Frame property should be 1, and at 0.1 the property should be 0.
- Then we shorten the timeline of the animation to 0.2 and click the two arrows for looping the animation.
- That will be our walk animation:
Jump and Fall Animation
- We also want to make a jump animation, for our third state.
- So, we create a new animation and name it “jump”.
- Select the Sprite2D and click the Key next to the Frame property at position 1.
- And lastly, we create a fall animation.
- Select the idle animation, and click on the Animation button next to it.
- Click Duplicate and call it “fall”.
Level Block
Great. Now for the next part, let us create a block, with which we can later make our level.
- Create a new scene with a StaticBody2D as the root node.
- Call it “LevelBlock”.
- Add a CollisionShape2D and a Sprite2D to it.
- Select the CollisionShape2D and add a new RectangleShape2D to the Shape.
- Select the Sprite2D and add the tile image to it.
- Adjust the Animation section of the Sprite2D in the Inspector.
- In our case, set the Hframes to 20 and the Vframes to 9.
- With the Frame property, you can select which tile you want to use as your level block. I just keep it at 0.
- Set the Filter in the Texture section to “Nearest”.
- And adjust the Collision Shape according to the tile size.

A Level for the Finite State Machine
- Now, for the level, let us create a new scene and choose 2D Scene.
- It will create a Node2D as root, and we just call that “FsmTut”.
- Let us add a Camera2D and a TileMap to it.
- Drag and drop the player.tscn scene onto the Scene Tree.
- Select the Camera2D and change the Zoom property to 2.
- Then Select the TileMap and in the Inspector at the Tile Set property create a new TileSet.
- Adjust the Tile Size according to the size of your LevelBlock – in our case, 18x18px.
- Then select the TileSet Tab at the bottom of the editor, click on the Plus sign and choose “Scene Collection”.
- Drag and drop the level_block.tscn scene into it.
- Now you can select the TileMap Tab at the bottom and use the LevelBlock to draw a level like so:

So, that is everything we need for setting up the main parts of our little tutorial. Next, we take a look, at how to make the FSM.
Create the Finite State Machine Script for the Player
- Open the Player scene.
- Select the root node “Player” and add a script (green plus sign above it).
- Call it “player.gd”.
- Replace everything in it with the following:
extends CharacterBody2D

const SPEED = 100.0
const JUMP_VELOCITY = -300.0
const GRAVITY = 1200.0

enum STATE {IDLE, WALK, JUMP, FALL}
var current_state : STATE

@onready var player_sprite : Sprite2D = $Sprite2D
@onready var anim_player : AnimationPlayer = $AnimationPlayer

func _ready() -> void:
_set_state(STATE.IDLE)- For the FSM to work, we basically want to be able to set a new state.
- But we also want to be able to determine what should happen, when the player enters the state, exits the state and when the player is currently in the state.
- So we need a “set” function, an “enter” function, an “exit” function and an “update” function:
Set the State
Every time you want to change the state, you will do it via the set function. First we check, if the state was changed, then we exit the old state and enter the new state:
func _set_state(new_state: STATE) -> void:
	if current_state == new_state:
		return

	_exit_state()
	current_state = new_state
	_enter_state()
Enter the new State
As the name says, it is called one time when the state changes to a new state. In our tutorial, we just change the animation here. Except for the jump state, there we also apply the jump velocity:
func _enter_state() -> void:
	match current_state:
		STATE.IDLE: # Enter IDLE state logic
			anim_player.play("idle")

		STATE.WALK: # Enter WALK state logic
			anim_player.play("walk")

		STATE.JUMP: # Enter JUMP state logic
			velocity.y = JUMP_VELOCITY
			anim_player.play("jump")

		STATE.FALL: # Enter FALL state logic
			anim_player.play("fall")
Update the State
Everything that needs to happen in the current state, will be handled in this function. This will handle how the player moves, how gravity is applied and what should happen if an input is made inside a specific state.
func _update_state(delta: float) -> void:
	# Get the input direction and handle the movement/deceleration.
	var direction = Input.get_axis("ui_left", "ui_right")
	match current_state:
		STATE.IDLE: # Update IDLE state logic
			if direction: # If left or right is pressed, start walking
				_set_state(STATE.WALK)
			elif !is_on_floor(): # if not on floor, fall down
				_set_state(STATE.FALL)
			elif Input.is_action_just_pressed("ui_accept"):
				_set_state(STATE.JUMP) # if the jump button is pressed, then jump

		STATE.WALK: # Update WALK state logic
			velocity.x = direction * SPEED # Set the move direction
			if velocity.x > 0: # Set Sprite direction
				player_sprite.flip_h = true
			elif velocity.x < 0:
				player_sprite.flip_h = false

			if !is_on_floor(): # if not on floor, fall down
				_set_state(STATE.FALL)
			elif Input.is_action_just_pressed("ui_accept"):
				_set_state(STATE.JUMP) # if jump is pressed, jump
			elif velocity.x == 0: # if standing still, then set idle
				_set_state(STATE.IDLE)

			move_and_slide()

		STATE.JUMP: # Update JUMP state logic
			velocity.x = direction * SPEED # Set the move direction
			if velocity.x > 0: # Set Sprite direction
				player_sprite.flip_h = true
			elif velocity.x < 0:
				player_sprite.flip_h = false

			if !is_on_floor(): # if in the air, apply gravity
				velocity.y += GRAVITY * delta
				if velocity.y > 0: # after max height, change from JUMP to FALL
					_set_state(STATE.FALL)

			move_and_slide()

		STATE.FALL: # Update FALL state logic
			velocity.x = direction * SPEED # Set the move direction
			if velocity.x > 0: # Set Sprite direction
				player_sprite.flip_h = true
			elif velocity.x < 0:
				player_sprite.flip_h = false

			if is_on_floor(): # If the ground is reached, change back to idle
				_set_state(STATE.IDLE)
			else: # if still in the air, apply gravity
				velocity.y += GRAVITY * delta

move_and_slide()- It should be called continuously, so we update this function in the physics process:
func _physics_process(delta: float) -> void:
	_update_state(delta)
Exit the State
Whenever you exit a state, maybe you want to do something as well. For that, we have this function:
func _exit_state() -> void:
	match current_state:
		STATE.IDLE: # Exit IDLE state logic
			pass

		STATE.WALK: # Exit WALK state logic
			pass

		STATE.JUMP: # Exit JUMP state logic
			pass

		STATE.FALL: # Exit FALL state logic
			pass
Customize and Expand
That’s the basics of setting up a simple FSM. You can expand this with any states you want and still keep a simple and understandable structure. For example, we can now easily add small dust particles, whenever the player touches the ground after a fall.
- For that, create a new scene and choose a CPUParticle2D node.
- Set One Shot to true.
- Explosiveness to 1.
- The Direction to x = 0, y = -1, and the Spread to 90.
- Velocity Min to 5px/s and Velocity Max to 10px/s.
- Gravity to 0.
- Save the scene:
- In the player script, add the following line (to the top of the script):
@export var dust : PackedScene- Then select the Player node and drag and drop the dust scene onto the new property:
- And lastly, update the fall state in the
_exit_state()function:
func _exit_state() -> void:
	match current_state:
		STATE.IDLE: # Exit IDLE state logic
			pass

		STATE.WALK: # Exit WALK state logic
			pass

		STATE.JUMP: # Exit JUMP state logic
			pass

		STATE.FALL: # Exit FALL state logic
			# Instantiate and set a new dust particle scene
			# every time the player ends the fall state:
			var new_dust : CPUParticles2D = dust.instantiate()
			get_parent().add_child(new_dust)
			new_dust.global_position = global_position + Vector2(0,12)
			new_dust.emitting = true
			await new_dust.finished
			new_dust.queue_free()
Test Your Finite State Machine in Godot 4
All in all, our little project should look something like the following. The player should switch states depending on the input and the situation. We can move the player with the arrow keys and jump with the space bar. When falling from a block, the player changes into the fall state. And the dust should appear, whenever the player exits the fall state:
And that’s it
Congratulations on completing this tutorial on creating a Finite State Machine in Godot 4! You’ve now acquired a fundamental skill that will greatly enhance your ability to manage complex game behavior and create more dynamic and responsive game entities.
And remember, the knowledge gained here can be applied to a variety of game elements, so feel free to experiment and adapt the FSM to suit the specific requirements of your projects. As you continue your game development journey, consider exploring more advanced FSM concepts and integrating them into larger game systems.
I hope this tutorial has been a valuable resource for you. Best of luck with your game development endeavors, and may your FSMs bring order and flexibility to your game worlds!
Download the source files
If already subscribed, you can find all project files here. Otherwise, you can subscribe to the mailing list to get access to this and other project files for free and get notified, when a new tutorial is posted.


