Basic 3D Animations in Godot 4 – Tutorial
Welcome to this tutorial on basic 3D animations in Godot 4. Animations are an essential part of game development, and Godot provides powerful tools to create and manage them. In this tutorial, we’ll go through the basic steps of creating an animation in Godot, from adding an AnimationPlayer node to your scene, to adding key frames and playing the animation.
Dear reader, please consider supporting my game ❤
Set up the scene for basic 3D animations in Godot 4
- Make a new project and create a new Node3D scene.
- Now call it “AnimTut” or however you want.
- Add a Camera and a Light to the scene and adjust it.
- Create a MeshInstance3D. Add a BoxMesh and create a StandardMaterial3D for it.
- Add an AnimationPlayer to the scene.
- The scene should look something like this:

- Next, click the AnimationPlayer and create three new animations.
- You can do this at the bottom of the screen in the “Animation” tab.
- Call them “move”, “spin” and “jump”:


Create the “move” animation
- After selecting the “move” animation, click the MeshInstance3D and in Transform > Position click the key icon.
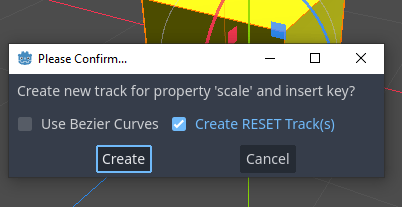
- You will be asked if you want to create a track. Click the “Create” button.
- A new track appears in the “Animation” tab.


- Set the time in the animation track to 0.5 sec and the
position.xto 2 m. - Click the corresponding key icon again.
- Now move the time to 1 sec, the
position.xto 0 m and click the key icon again. - Also, click the “Animation Looping” button on the right side of the animation panel.
- If you click the play button in the animation panel, it should look like this:
Creating the “spin” animation
- Select the “spin” animation in the animation panel.
- At time 0 sec, click on Transform > Rotation and click the key icon.
- Then click “Create” track again.
- At time 1 sec, change
rotation.yto 360 and click the key icon again. - Also, click the loop button.
- If you press play, it should look like the following:
Making the “jump” animation
- Now select the “jump” animation in the animation panel.
- At time 0 sec, press the Transform > Position key with everything at 0 m.
- Create the new animation track.
- Got to time 0.5 sec and change
position.yto 1 m. Click the key icon. - At time 1 sec, change it back to 0 m and click the key button again.
- This time, you don’t click the loop button.
- The animation should look like this:
Play the basic 3D animations in Godot 4
- To play the animations, we first need to add a script to AnimTut.
- Click on Add Script and create the new script.

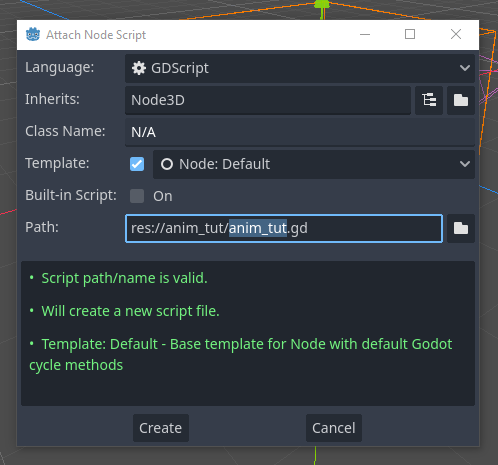
- Inside the script, replace the code with the following:
extends Node3D

@onready var anim_player : AnimationPlayer = $AnimationPlayer

func _input(event: InputEvent) -> void:
	if event is InputEventKey:
		if event.keycode == KEY_1 && event.pressed:
			anim_player.play("move")
		elif event.keycode == KEY_2 && event.pressed:
			anim_player.play("spin")
		elif event.keycode == KEY_3 && event.pressed:
			anim_player.play("jump")
		elif event.keycode == KEY_4 && event.pressed:
			anim_player.pause()
		elif event.keycode == KEY_5 && event.pressed:
anim_player.stop()- If you run the scene, you can play the different animations with the different keys:
- 1-3 will play the corresponding animation
- 4 will pause the current animation.
- 5 will stop the AnimationPlayer and reset the animation.
- All in all, if you run the scene, it should look kind of like this (depending on what keys you press):
And that’s it for this tutorial on basic animations in Godot 4. I hope you found it helpful and that it has given you a good foundation for creating your own animations in Godot 4. With these basic steps, you can create simple animations. And as you become more familiar with the software, you can explore more advanced animation techniques and create even more complex animations. Thank you for reading, and happy game development!
If you want to know more about the AnimationPlayer node, you can have a look at the official documentation.
Download the source files
If already subscribed, you can find all project files here. Otherwise, you can subscribe to the mailing list to get access to this and other project files for free and get notified, when a new tutorial is posted.


