Resource System in Godot 4 – Tutorial
The resource system in Godot 4 is a powerful tool for managing assets, such as textures, audio files, and even custom data types. One of the main advantages of using resources is that they can be reused and shared between different parts of your project. For example, if you have a sound effect that is used in multiple levels of your game, you can create it as a resource and load it into each level as needed. This not only saves you time, but also reduces the size of your project. This tutorial will cover the basics of how to use the resource system and create your own custom resources.
Dear reader, please consider supporting my game ❤
Resources in Godot 4
A resource in Godot 4 is a piece of data or asset that is stored in a separate file, and can be loaded and used by your game. Examples of resources include images, sounds, music, fonts, and even scenes or scripts. Resources are saved as files with specific extensions, depending on their type. The engine automatically handles importing all supported files, making it easy to work with assets in your project.
Set up the scene
For our tutorial, we will create a little demo project. For that, create a new project in the Project Manager.
- Then go to Scene > New Scene and create a new User Interface scene.
- Call it “ResourceTut” or however you like.
- Add a TextureRect, a Label, an AudioStreamPlayer and two Buttons.
- Call them “ButtonG” and “ButtonM”.
- Also, add a Script to the base node, the ResourceTut.
Built-in resources
Next, we need some assets. For this tutorial, we will add a sound file and images as resources. First, I went to kenney.nl and found two animal heads as .png. Then I searched for a free sound file in .ogg format.
- Throw everything into a folder called “buildin_res” in your project. Godot will automatically import them.
- Click on each button, and in the Inspector, change the text to something representing your image.
- In my case, this would be “Giraffe” and “Monkey”.
- Then, click the TextureRect and set the
expand_modeto “Ignore Size”. - Arrange the elements somewhat like in the screenshot below:

Godot 4 comes with a large collection of built-in resources that can be used in your projects. These include textures, meshes, animations, sounds, and more. To use a built-in resource, you first need to add them to your project (which we already did) and then create a reference to it. This can be done in more ways, and I will show you three different ways in this tutorial. But first, let us create some custom resources.
Custom resources
In addition to built-in resources, you can also create your own custom resources. This is a powerful feature and useful for storing data that is specific to your game or application. For example, this could be items, character stats, etc. To create a custom resource, you first need to define a new class that extends the Resource class.
- So, first, we create a new script.
- Create a “custom_res” folder and in it right-click and click on New > Script.

- We want, that this script inherits from “Resource”, so write that into the corresponding field.
- We don’t need a template.
- Call that script something like “char.gd”, or whatever you see fit.
- Open that script, and add the following to it:
extends Resource # The script extends the Resource class
class_name CharRes # The name of the new custom resource

@export var alias : String # custom variable, useful for your game
@export var img : Texture # custom variable, useful for your game- Then, right-click again and choose New > Resource.

- Search for the newly created custom resource called “CharRes”.
- Click “Create”.
- Make sure you are in the right folder and save it with a proper name.
- In my case, I call it “giraffe.tres” and “monkey.tres”.


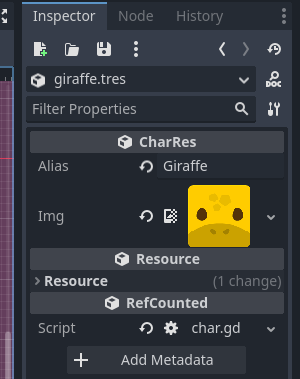
- When both are created, double click one of the resources (for example, “giraffe.tres”).
- In the Inspector, you will see the variables that we determined in the “char.gd” script.
- Now the cool thing is, that you can define built-in resources in your custom resources as well, as we have done with the
imgvariable. - So, drag and drop the images (giraffe.png and monkey.png in my case) and add them to the custom resources.
- Also give them a name in the
aliasfield.

How to use the resource system in Godot 4
Great, now we have some built-in resources like images and sounds as well as some custom resources. Next, let us take a look at how we can actually use all of those resources. As I pointed out earlier, there are different ways to reference a resource.
Use the export keyword
You can use the @export keyword and declare, which resource it should be able to take. You can then add that resource via the Inspector (similar, as we have done with the image for our custom resources).
- In the ResourceTut script, delete everything (if anything is in it) and add the following:
extends Control

# Load a resource via export to the editor:
@export var giraffe : CharRes- When you click on the ResourceTut node, you are now able to add your custom resource via the Inspector.
Preload a resource
Use the preload() keyword to load a resource at compile time. It takes a path to the resource in your project. Since it is loaded during compiling, the path has to be constant and cannot be altered during run-time.
- Add the following to our “resource_tut.gd” script.
- It should be a path to the sound file.
- Below that, I just added references to the nodes in our project.
# Load a resource at compile time:
@onready var ambience_sound : AudioStream = preload("res://buildin_res/ambience.ogg")- Below that, we want to add the following to the script:
# The following are references to the nodes:
@onready var button_g : Button = $ButtonG
@onready var button_m : Button = $ButtonM
@onready var texture_rect : TextureRect = $TextureRect
@onready var label : Label = $Label
@onready var audio_player : AudioStreamPlayer = $AudioStreamPlayer
Load a resource
The load() method is the most basic method for loading a resource. It takes a path to the resource as a parameter and returns a reference to the loaded resource at runtime. For example, to load one of our custom resources, you can use the following code in the “resource_tut.gd” script:
func _ready() -> void:
	# Load a resource at runtime:
var monkey : CharRes = load("res://custom_res/monkey.tres")- And also add this right below:
	# Connect the Buttons via code:
	button_g.pressed.connect(_on_button_pressed.bind(giraffe))
	button_m.pressed.connect(_on_button_pressed.bind(monkey))

	# Set the audio stream to our audio file and play it:
	audio_player.stream = ambience_sound
	audio_player.play()

func _on_button_pressed(res: CharRes) -> void:
	# When a button is pressed, set Label and TextureRect
	# according to the resource:
	texture_rect.texture = res.img
	label.text = res.alias
Wrap up the resource system in Godot 4 tutorial
So far, so good. Now save the scene and run it. It should behave like in the video below. First, the sound file should be played automatically after start. And whenever you click a button, the corresponding custom resource should be displayed.
In this tutorial, we have covered the basics of the resource system in Godot 4, including the different types of resources and how they can be loaded, accessed, and managed in your projects. We also explored how to create custom resources and the benefits they can provide for your game development workflow.
By mastering the resource system in Godot 4, you will have a powerful tool at your disposal to create complex, data-driven games that are easy to manage and update. Whether you’re working on a small indie project or a large-scale commercial game, understanding how to use the resource system effectively can help you achieve your goals more efficiently and with greater ease.
Download the source files
If already subscribed, you can find all project files here. Otherwise, you can subscribe to the mailing list to get access to this and other project files for free and get notified, when a new tutorial is posted.


