2D Tilemaps in Godot 4 – Tutorial
Welcome to this tutorial on creating 2D tilemaps in Godot 4. Whether you’re a beginner just starting with Godot or an experienced developer looking to expand your skills, understanding how to work with tilemaps is essential for crafting rich and dynamic 2D game worlds. In this tutorial, we will take you through the entire process. By the end, you’ll have the knowledge and tools to design intricate levels, define terrain, handle collisions, and more, all using Godot’s powerful 2D tilemap system. So, let’s dive in!
Dear reader, please consider supporting my game ❤
Setting up the Project
- Open Godot 4 and create a new project. Give it a name and choose a location to save it. Then go to Scene > New Scene and create a Node2D.
- For this project, I will use a tileset from kenney.nl.
- Download the same or create your own tileset and just copy it into the project folder.
- Then click the Add Node button and add a Tilemap to it.
Set up the 2D Tilemaps in Godot 4
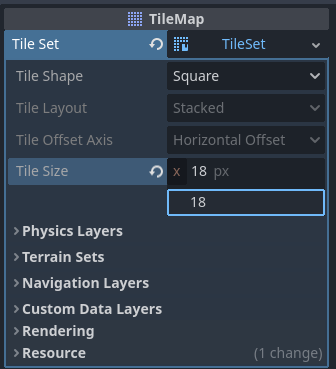
- Click on the Tilemap and in the Inspector create a new TileSet.
- For this project, set the TileSize to 18×18 pixels.
- Go to the bottom taps and click on TileSet to open the tileset window. (In this tutorial, I will refer to this tap as TileSetTab)
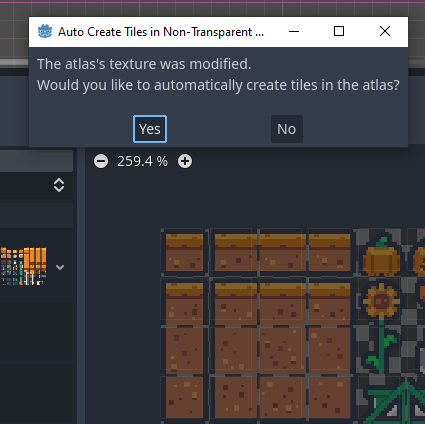
- Then drag and drop the image from the FileSystem into the empty window.
- And click Yes to the popup asking if you want to automatically create tiles in the atlas.
- You will notice, that the tiles are off. That is because the tileset has one pixel separating each tile.
- To fix this, change Separation to 1×1:

- That is basically it. You can now click the TileMapTab at the very bottom of the editor and start drawing tiles.
- Left click for placing tiles, right click for deleting tiles.
- If the tiles are somewhat washed out, go to TileMap > Texture and change it to “Nearest”, so that the tiles are clear pixels without a filter.

- So, this is basically the tilemap. But that is not all. You can do a lot more with the tileset to improve your workflow. Let’s take a look at different aspects and possibilities.
Add Collision to Tiles
- It sure would be nice if the tiles would have some collision attached to them.
- For that, go to TileMap > Physics Layers and click on Add Element.
- Then you can go to the TileSetTab > Physics Layer and create a collision box for individual tiles. (Select a tile first, and make use of the snap.)
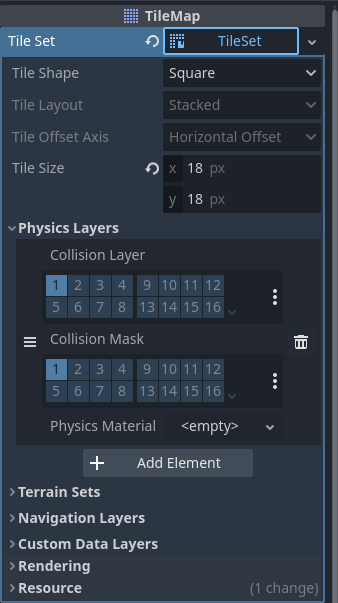

- Repeat this for every tile, that should have collision detection.
- If you now place those tiles, they will have collision.
- The same way, you can add Navigation Layers, Custom Data Layers and Rendering Layers to individual Tiles. We won’t cover them here in detail, but the procedure is the same.
TileMap Layers
- You can add more than one layer to a tilemap. This can be useful to separate different layers like background, foreground, environment, etc.
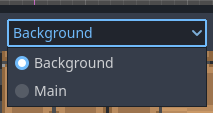
- Go to TileMap > Layers and click Add Element. Add as many layers as you need.
- Then you can change them in the TileMapTab by selecting the layer in the drop-down menu in the top right corner.
- You can now place Background tiles behind the Main tiles.


Add Scenes as Tiles
- For even more functionality, you can add whole scenes as tiles.
- To do that, create a new scene and add a RigidBody2D.
- Add a CollisionShape2D and in Shape add a CircleShape and change the radius to 8px.
- Then add a Polygon2D and draw (more or less) a circle with it.
- Save the scene as “ball.tscn” or however you like.

- Then go back to the main scene, click on the TileSetTab and click the little plus sign at the bottom.
- Click on Scene Collection.
- Next, drag and drop the ball scene from the FileSystem into the window.

- You can now add this scene to the tilemap the same way, as you would with ordinary tiles (Change to the TileMapTab first).
Make Patterns
- It is also possible to define Patterns.
- For that, go to the TileMapTab and draw the pattern you like.
- Then select that pattern and drag and drop it into the pattern window.
- You can now use the Paint tool, to place those patterns wherever you like:
Use Terrain Sets for Autotiling
- It is also possible to create autotiling sets.
- For that, go to TileMap > Terrain Sets and click Add Element (2 times).
- Give it a name and a color.
- Then go to the TileSetTab > tilemap.png > Paint and set it up accordingly.


- You then have to tell Godot which connections should be made.
- To place the autotiles go to the TileMapTab > Terrains and click your autotile set.
- Check out the video how to set all of that up:
Wrap up
- To see your tilemap in action, just add a Camera2D and build your map. Check out mine, for example:
Great! You’ve reached the end of this tutorial on 2D tilemaps in Godot 4. I hope this guide has provided you with the essential skills and knowledge needed to harness the full potential of tilemaps for your game projects. Whether you’re building platformers, RPGs, or puzzle games, the concepts you’ve learned here will serve as a solid foundation.
Feel free to explore Godot’s documentation and community resources for further guidance and inspiration. The world of game development is vast and ever-evolving, and with Godot 4’s powerful tools at your disposal, the possibilities are limitless. Best of luck with your game development endeavors!
Download the source files
If already subscribed, you can find all project files here. Otherwise, you can subscribe to the mailing list to get access to this and other project files for free and get notified, when a new tutorial is posted.


