Godot 3 Key Bindings – Tutorial
Most games let you assign custom keys to each action. For example, one person likes to use the ‘c’ button to crouch, and the other wants to use ‘CTRL’. Of course, you can make your own custom key bindings interface in Godot. And in the Godot 3 Key Bindings Tutorial, we will go through it.
Dear reader, please consider supporting my game ❤
Input Map in Godot
First, if you haven’t already, you should take a look at the Input Map. It allows you to assign one or more keys to an action. Even if you don’t plan to make custom key bindings, it is good practice to use the Input Map, since it lets you easily add, remove or change an associated action to any input from the keyboard, the mouse, a joystick, etc.
You can find the Input Map under Project > Project Settings > Input Map. Type in an action name and click add. Then, on the plus sign, you can assign an input to the created action.

Starting the Godot Key Bindings Tutorial
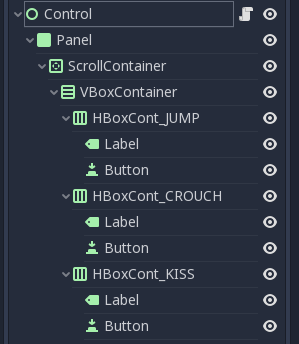
For our Godot Key Bindings Tutorial, we create a new Scene in our Godot Engine and create a Control node in it. Then we also add a Panel, a ScrollContainer, and a VboxContainer to it. We also add a Script to our Control node. So, your tree should look something like this so far.

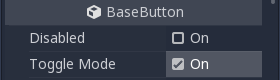
Next, we add a HboxContainer for each action, that we want to use. In our example, we will use three actions: JUMP, CROUCH, and KISS. So we add the first HboxContainer and add a Label and a Button to it. Also, let us make the button toggle-able.
Then we duplicate it two times. Voilà. We also name them HBoxCont_JUMP, HBoxCont_CROUCH, and HBoxCont_KISS. You can play around with the different alignments and sizes so that you get a nice little panel with labels and buttons in it.
Next, let us add those actions to our Input Map. Go to Project > Project Settings > Input Map and add JUMP, CROUCH, and KISS as actions. Then click the Plus Sign and add a Key. Use whatever keyboard key you like.

You should align the different nodes in your Control node in a way so that you can see everything. Also, add the text Jump, Crouch, and Kiss to the Labels inside the HBoxContainers.
At last, some code!
Now we open the Script attached to the Control node and add the following lines:
extends Control

var can_change_key = false
var action_string
enum ACTIONS {JUMP, CROUCH, KISS}
The first line we use is to determine if we currently want to change the button or not. Action_string will save the name of the action we want to change (whenever we want to change it) and the enum ACTIONS has all the actions in it, that we want to be customizable. Since we have toggle-able buttons, let us also add the following:
func _ready():
	_set_keys()

func _set_keys():
	for j in ACTIONS:
		get_node("Panel/ScrollContainer/VBoxContainer/HBoxCont_" + str(j) + "/Button").set_pressed(false)
		if !InputMap.get_action_list(j).empty():
			get_node("Panel/ScrollContainer/VBoxContainer/HBoxCont_" + str(j) + "/Button").set_text(InputMap.get_action_list(j)[0].as_text())
		else:
			get_node("Panel/ScrollContainer/VBoxContainer/HBoxCont_" + str(j) + "/Button").set_text("No Button!")
This way we make sure, that no button appears pressed and that every action has a button assigned to it. Otherwise, it will tell you that there is no button assigned. Be aware, that in order to make this tutorial work, you have to use the exact same names and spelling for the enums, the HBoxCont_*, and the actions defined in the Input Map. Run the scene and you should see something like this:

Next, we add a signal to each button, to trigger an event. If you want to know more about signals, check here. We have three buttons, so we add three pressed() signals and also this code:
func b_change_key_JUMP():
	_mark_button("JUMP")

func b_change_key_CROUCH():
	_mark_button("CROUCH")

func b_change_key_KISS():
	_mark_button("KISS")
Whenever a button is pressed, we call _mark_button() and send them the name of the action as a string. Our _mark_button method looks like this:
func _mark_button(string):
	can_change_key = true
	action_string = string

	for j in ACTIONS:
		if j != string:
			get_node("Panel/ScrollContainer/VBoxContainer/HBoxCont_" + str(j) + "/Button").set_pressed(false)
Changing the keys
So we want that we can change the key and assign the string of the key we want to change to our action_string. Then we set all other buttons to false, in case we have selected one before. Next, we add an input event, to get the new input.
func _input(event):
	if event is InputEventKey:
		if can_change_key:
			_change_key(event)
			can_change_key = false
We only want to call _change_key if can_change_key is true. And after we called _change_key, we set can_changekey to false again. Our _change_key looks as follows.
func _change_key(new_key):
	#Delete key of pressed button
	if !InputMap.get_action_list(action_string).empty():
		InputMap.action_erase_event(action_string, InputMap.get_action_list(action_string)[0])

	#Check if new key was assigned somewhere
	for i in ACTIONS:
		if InputMap.action_has_event(i, new_key):
			InputMap.action_erase_event(i, new_key)

	#Add new Key
	InputMap.action_add_event(action_string, new_key)

	_set_keys()
First, we check, if there is already a key assigned. In this case, it deletes the key. Then we check, if this key is assigned somewhere else, and if yes, we delete this key as well. And last we add a new key, which consists of the event from our input, and add it to the action, which still is our action_string. If you now run the scene, you should be able to click on a button, and then on a key. The key should then be assigned to the button.
Add a second scene to Godot 3 Custom Key Bindings Tutorial
So far, so good. Now we have to check if it actually works. Let us create a second scene for this. In it, we just create an empty node and add a script to it. In the script, we write the following:
func _input(event):
	if event.is_action_pressed("JUMP"):
		print("Jump")
	if event.is_action_pressed("CROUCH"):
		print("Crouch")
	if event.is_action_pressed("KISS"):
		print("Kiss")
We also add a button to the scene, create a signal and in it, we navigate back to our scene 1.
func _on_Button_button_down():
	get_tree().change_scene("res://scene_1.tscn")
Then we go back to scene 1, add a button to the bottom, create a signal, and in it, we navigate to scene 2.
func _on_Button_button_down():
	get_tree().change_scene("res://scene_2.tscn")
And we are ready for testing. You can assign different keys to the actions in scene 1, then go to scene 2 and test them. Every time you press or click the assigned key, it should print the correct key to the console.
If you find this useful, let me know in the comments below. Also, feel free to check out other Godot tutorials and topics.


