Introduction to Godot 3
In this post, I want to go over how to start with Godot. So, in this Introduction to Godot 3, we will go over where to download the Engine. We will look at how the engine UI is set up and what scenes, nodes, and scripts are. This post is for someone, who knows what the Godot Game Engine is but never touched it. If you have no idea about Godot, check my post about what this engine even is.
Downloading and installing Godot
Let’s start this introduction to Godot 3 with where to find and download the Godot Game Engine. It is not hard to find with a quick search, but for your convenience, you can choose and follow one of the places below.
Official Website
You can find the newest version along with the requirements and instructions on the official website in the download section.
Steam
One of the most convenient places to get the Godot Game Engine – in my opinion – is on Steam. It will install automatically, like any other software/game on Steam.
itch.io
Itch.io is also a great place to download the Game Engine.
GitHub
Since Godot is Open Source, you can always go to GitHub and also find it there.
Project Manager
After installation, you can open the App and you will get to the Project Manager. Here you will find your projects, as well as demo projects if you have downloaded and scanned for any of them.

A good place to find demo projects is the Asset Library. Just download the project, extract it if necessary and scan the folder. It should then be added to your list.
Introduction to Godot 3 UI
Next up, in the introduction to Godot 3, let us have a quick look around. After you created a new project, you will be looking at the default Godot UI.

- This is the main menu for the engine. You will find all kinds of things there, like game settings, debug options, editor settings, actions concerning the current scene, export options, etc.
- Here you have the scene tree of the current scene. This scene is empty, so there is currently no node in the scene tree, but you can add any node, which will be the root node of the scene. Also, there is a tab for the import options for a given resource (like for example an image, or sound file).
- This is the file system of the current project. Any file (recognized by Godot) will show up here. From here you can open the file, drag & drop them, and so on.
- This is the main view of the editor. It can look different, depending on if you have a 2D scene, 3D scene, or script currently open.
- Here you can switch manually between the different views.
- Up here you can play, pause and stop the game, or only this scene if you wish to do so.
- This is the inspector, it will list all the properties of a selected node (for example the transformation of the currently selected mesh, etc.). You also find the node tab here, where you can connect signals or add a node to a specific group.
- Down here you find the output, the debugger, the audio bus, and also some circumstantial windows, like the animation player or the shader code editor, which requires you to select the node/shader first.
Customize the UI
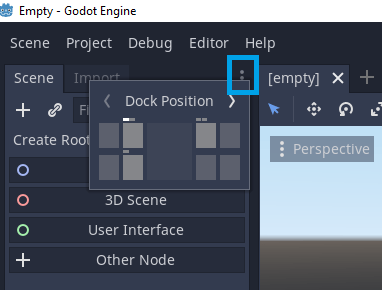
Alright, with the overview out of the way, here is a possibility to customize your UI: If you click the three dots, you can change the docking position of that window. You can play around with it if you want, to tailor it more to your liking.
Another way to customize your view is by clicking this button in the file system window. It will split the window into file structures and resources in the selected folder.

Introduction to Godot 3 Scenes
Most of the things you create in Godot are scenes. They can be large scenes like a whole level, or they can be very small scenes, only consisting of one node, for example, a 3D mesh. You can save scenes, and add (smaller) scenes, to other (bigger) scenes. So your main scene can be the level, and in it, you have the player, which is a scene, the enemy, which is another scene, and the map, which again, is another scene. It may sound strange at first, but if you start using it, you will quickly get the hang of it. Every scene can be saved with the .tscn file ending:

Introduction to Godot 3 Nodes
Every scene is made up of one or more nodes. There is an expansive list of built-in nodes, which you can add by clicking the plus sign. But you can also create your custom nodes for your own project if you need to do so.

All the built-in nodes have their more or less specific use case, and most inherit another. This means if you add a MeshInstance, you can modify all the properties and use all methods, that this node inherits:

In this case, it would have all the methods and properties of the Node, the Spatial, the CullInstance, the VisualInstance, and the GeometryInstance.
Introduction to Godot 3 Scripts
Next, in the introduction to Godot, we have a look at scripts. Whenever you need additional functionality for your nodes, you can add a script to that node. GDScript is the native coding language of Godot (there is also the possibility to use C#). You can add a script by dragging & dropping it from the file system, or clicking this button when a node is selected:

If you open a script, you will see the following view:

- Scripts in the file system are files ending with .gd. Double-click them to open, or drag & drop them onto a node, to add it.
- Here you find all recently opened scripts in your project. Click any of them with the middle mouse button, to close it.
- Here you find all methods from the currently opened script. Click to jump to that method.
- The code editor view. Here you write your code.
- Switch manually to and from the script view.
- Here is a link to the online documentation, but you can also search internally for any method, property, or method – which is immensely helpful.
- This is a small overview as well as the scroll bar of the current script.
Additional Resources
Well, that is it for a very basic introduction to Godot 3. If you are new, I would recommend having a look at the demo projects, mentioned at the beginning. You can also check out some of my other posts, that go more into depth. But the best way to learn Godot is to start creating with it.


